![]()
Thank you for your interest in this pattern. I hope you enjoy making your own Deadpool! If you have any questions or concerns, you can email me at lovetobeinstitches@gmail.com
Pattern by Debbie McLeod ( https://www.facebook.com/lovetobeinstitches?ref=hl ) Absolutely NO part of this pattern may be reproduced, transmitted or redistributed in any way. Only print a copy of this pattern for your own personal use! Finished items can be sold.
Please share your finished designs with me on Facebook or you can also find me on Ravelry: http://www.ravelry.com/designers/love-to-be-in-stitches I would love to see them!
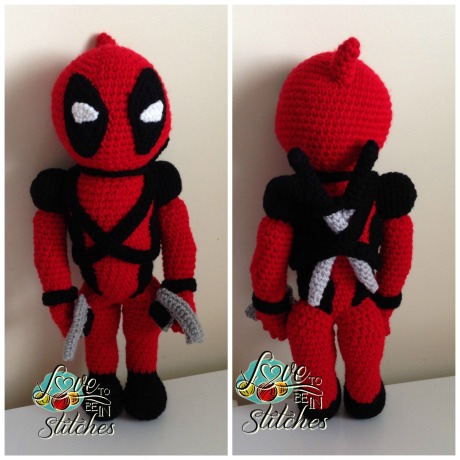
This pattern uses American crochet terms and is considered to be Intermediate to Advanced. Gauge is not really important with this amigurumi. My finished size, measuring from head to foot is approximately 16 inches tall.
Materials Needed:
G/4.25mm crochet hook
E/3.50mm crochet hook
Red, Black, White, Gray yarn – Red Heart Super Saver (#4 Worsted Weight)
Polyester fiberfill
Stitch marker
Yarn needle
Scissors
Stitches Used:
Ch – Chain
Slst – Slip stitch
Sc – Single crochet
Hdc – Half Double crochet
Dc – Double crochet
BLO – Back Loop Only
FLO – Front Loop Only
Rnd – Round
Adj Ring – Adjustable Ring
Sc2tog – Single crochet 2 together (invisible decrease – if you’re unfamiliar with this technique, refer to this link: http://www.crochetspot.com/how-to-crochet-single-crochet-invisible-decrease/ ) – THIS IS NOT MY LINK!
**If you are not comfortable with the Adjustable Ring, you can chain 2 and make the amount of stitches in the second chain from hook**
Notes:
- This pattern is worked “in the round” without joining at the end of each round. ALL stitches are worked in both loops unless otherwise specified.
- Place your stitch marker at the beginning of each round to make it easier to keep track of your Round number.
Head
With G hook and red:
Rnd 1: 6sc in adj ring. Pull ring closed. (6)
Rnd 2: 2sc in each around (12)
Rnd 3: *1sc, 2sc* Repeat from *to* around (18)
Rnd 4: *Sc in 2sts, 2sc in next* Repeat from *to* around (24)
Rnd 5:* Sc in 3sts, 2sc in next* Repeat from *to* around (30)
Rnd 6: *Sc in 4sts, 2sc in next* Repeat from *to* around (36)
Rnd 7: *Sc in 5sts, 2sc in next* Repeat from *to* around (42)
Rnd 8: *Sc in 6sts, 2sc in next* Repeat from *to* around (48)
Rnd 9 – 17: Sc in each st around (48)
Rnd 18: *Sc in 6sts, sc2tog* Repeat from *to* around (42)
Rnd 19: *Sc in 5sts, sc2tog* Repeat from *to* around (36)
Rnd 20: *Sc in 4sts, sc2tog* Repeat from *to* around (30)
Rnd 21: *Sc in 3sts, sc2tog* Repeat from *to* around (24)
Rnd 22: *Sc in 2sts, sc2tog* Repeat from *to* around (18) Slst in first st of last rnd and finish off, leaving a long tail to sew head to the body. Stuff and set aside.
Point for the back of the head
With G hook and red:
Rnd 1: 4sc in adj ring. (4) Pull ring closed.
Rnd 2: Sc in each st around (4)
Rnd 3: 2sc in first st, sc in next 3sts (5)
Rnd 4: 2sc in first st, sc in next 4sts (6)
Rnd 5: 2sc in first st, sc in next 5sts (7)
Rnd 6: 2sc in first st, sc in next 6sts (8) Slst to first st of this round and finish off, leaving a tail. Stuff very lightly.
Black part of eyes (make2)
With E hook and black:
Row 1: Ch3
Row 2: 2sc in second st from hook, 2sc in next, ch1, turn (4)
Row 3: 2sc in first st, sc in next 2sts, 2sc in last st, ch1, turn (6)
Row 4: 2sc in first st, sc in next 4sts, 2sc in last st, ch1, turn (8)
Row 5: 2sc in first st, sc in next 6sts, 2sc in last st, ch1, turn (10)
Row 6: 2sc in first st, sc in next 8sts, 2sc in last st, ch1, turn (12)
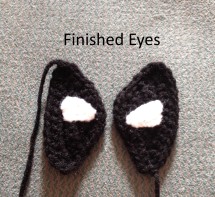
Row 7: Sc around entire “eye”, placing 2sc in each corner. Slst to first ch1 of this row and finish off, leaving a long tail to sew to head.
White part of eyes (make 2)
With E hook and white:
Row 1: Ch4. Slst in second ch from hook, sc in next st, 2hdc, slst in last st (5) Finish off, leaving a tail to sew to the black part of the eyes.
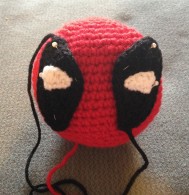
Sew the white part of the eyes to the black part, then pin to the face before sewing to make sure they are even. I left about 3 stitches between the eyes. Also, pin the “point” to the middle of the back of the head. Sew all pieces on when you’re happy with the placement.
Body
With G hook and red:
Rnd 1: Ch6. 2sc in second st from hook, sc in next 3sts, 4sc in last st. Working on opposite side of ch, sc in next 3sts, 2sc in last st. Place your stitch marker in this final stitch and do not join. You are still going to be working in the round. (14)
Rnd 2: Sc in each st around (14)
Rnd 3: 2sc in first 2sts, sc in next 5sts, 2sc in next 2sts, sc in the last 5sts (18)
Rnd 4: Sc in each st around (18)
Rnd 5: Sc, 2sc in next st, sc in next st, 2sc in next st, sc in next 6sts, 2sc in next st, sc in next st, 2sc in next st, sc in last 5sts (22)
Rnd 6: Sc in next 3sts, 2sc in next, sc in next 10, 2sc in next st, sc in next 7sts (24)
Rnd 7 – 10: Sc in each st around (24)
Rnd 11: Sc in next 5sts, 2sc in next st, sc in next st, 2sc in next st, sc in next 9sts, 2sc in next st, sc in next st, 2sc in next st, sc in next 4sts (28)
Rnd 12: Sc in next 5sts, 2sc in next st, sc in next st, 2sc in next st, sc in next 11sts, 2sc in next st, sc in next st, 2sc in next st, sc in next 6sts (32)
Rnd 13 – 20: Sc in each st around (32)
Rnd 21: Sc in next 15sts, 2sc in next st, sc in next st, 2sc in next st, sc in next st, 2sc in next st, sc in next st, 2sc in next st, sc in next 10sts (36)
Rnd 22 & 23: Sc in each st around (36)
Rnd 24: *Sc in next 4sts, sc2tog* Repeat from *to* around (30)
Rnd 25: *Sc in next 3sts, sc2tog* Repeat from *to* around (24)
Rnd 26: Sc in next 2sts, sc2tog around (18) Slst in first st of last rnd and finish off. Hide your tail, stuff the body and sew the head to the body, making sure that the increases from Rnd 21 are in the front.
Shoulders (Make 2)
With G hook and black:
Rnd 1: 6sc in adj ring. (6) Pull ring closed.
Rnd 2: 2sc in each st around (12)
Rnd 3: *Sc in next st, 2sc in next* Repeat from *to* around (18)
Rnd 4: In BLO, sc in each st around (18)
Rnd 5 – 8: In BOTH loops, sc in each st around (18) Slst in first st of last rnd and finish off, leaving a long tail to sew to the body.
Arms and Hands (Make 2) – DO NOT stuff the fingers
With G hook and red:
Rnd 1: 6sc in adj ring. (6) Pull ring closed.
Rnd 2: 2sc in each st around (12)
Rnd 3: In BLO, sc in each st around (12)
Rnd 4: In BOTH loops, sc in each st around (12)
Rnd 5 – 10: Sc in each st around (12)
Rnd 11: Sc in 5sts, dc in next 2sts, sc in next 5sts (12)
Start stuffing.
Rnd 12 – 14: Sc in each st around (12)
Rnd 15: *Sc in next 2sts, sc2tog* Repeat from *to* around (9)
Rnd 16 – 18: Sc in each st around (9)
Rnd 19: *Sc in 2sts, 2sc in next* Repeat from *to* around (12)
Rnd 20: *Sc in 2sts, 2sc in next* Repeat from *to* around (16)
Stuff a little more.
Rnd 21 (First finger): Sc in 2sts, skip 12sts, sc in last 2sts (4) Refer to photo A below.
Rnd 22 & 23: Sc in each st around (4) Slst in first st of last rnd and finish off, leaving a tail to weave the hole closed.
Rnd 24 (Second finger): Join yarn with a slst in the first free st beside the first finger. Sc in that same st and in the next st, skip 8sts, sc in next 2sts. (4) Refer to photo B below.
Rnd 25: Using the 4sc just made, sc in each st around (4)
Rnd 26 & 27: Sc in each st around (4) Slst in first st of last rnd and finish off, leaving a tail to weave the hole closed.
**NOTE – Before making the next 2 fingers, stuff the hand, but not the fingers**
Rnd 28 (Third finger): Join yarn with a slst in the first free st beside the finger just made. Sc in that same st and in the next st, skip 4sts, sc in last 2sts. (4)
Rnd 29: Using the 4sc just made, sc in each st around (4)
Rnd 30 & 31: Sc in each st around (4) Slst in first st of last rnd and finish off, leaving a tail to weave the hole closed
Rnd 32 (Fourth finger): Join yarn with a slst in the first free st beside the finger just made. Sc in that same st and in the next 3sts. (4)
Rnd 33 & 34: Sc in each st around (4) Slst in first st of last rnd and finish off, leaving a tail to weave the hole closed.
Next, you are going to weave each finger end closed and weave your tail down through the finger to hide it. If you end up with a “gap” between your fingers, you can bring your tail out through the gap after feeding it through the finger and sew the hole together. Refer to Photo C below.


Pin the finished arm to the “side” of the shoulder (Refer to photos below) and with a length of red yarn and a needle, sew the arm on, using the free loops on the arm. Next, stuff your shoulders and pin them to the body. I pinned them about 2 rounds below where the neck is sewn to the body. Once you have them placed where you want them, using your black yarn from the shoulder, sew ¾ to the body, stuff a little more if necessary and finish sewing to the body. Weave in any ends.


Wrist Band (Make 2)
With G hook and black:
Ch 19, hdc in third st from hook and in each st across (17) Finish off, leaving a tail to sew the 2 ends together around the wrist. Weave in ends. I chose to sew the ENDS ONLY so they can be turned around the wrist, if necessary.
Side Stripe (Make 2)
With G hook and black:
Row 1: Ch 11, sc in second st from hook and in each st across, ch 1, turn (10)
Row 2 & 3: Sc in each st across, ch 1, turn (10)
Row 4: Sc2tog, sc in next 6sts, sc2tog, ch 1, turn (8)
Row 5: Sc2tog, sc in next 4sts, sc2tog, ch 1, turn (6)
Row 6 & 7: Sc in each st across, ch 1, turn (6)
Row 8: 2sc in first st, sc in next 4sts, 2sc in last st, ch 1, turn (8)
Row 9: 2sc in first st, sc in next 6sts, 2sc in last st, ch 1, turn (10)
Row 10: 2sc in first st, sc in next 8sts, 2sc in last st, ch 1, turn (12)
Row 11: Sc2tog, sc in next 8sts, sc2tog, ch 1, turn (10)
Row 12: Sc2tog, sc in next 6sts, sc2tog, ch 1, turn (8)
Row 13: Sc2tog, sc in next 4sts. Sc2tog, ch 1, turn (6)
Row 14 – 17: Sc in each st across, ch 1, turn (6) At the end of Row 17, DO NOT ch 1 and DO NOT turn. Continue to sc around the whole outer edge, ending with a slst to the first st where Row 17 started (do not sc along the bottom). Finish off, leaving a long tail to sew to the body.
Pin the side stripes immediately under the arms (black shoulder piece), making sure they are evenly placed and sew to the body.
Neck Band
With G hook and black:
Ch 31, sc in second st from hook, and in each st across (30) Finish off, leaving a tail to sew the ends together at the back of the neck. Weave in ends.
Right Leg and Foot
With G hook and black:
**Starting with the sole of the foot and working up**
Rnd 1: Ch5, sc in second st from hook and in next 2, 3sc in last st, (working on other side of chain) sc in next 2sts, 2sc in last st (10) Place your stitch marker in this last st, DO NOT JOIN as we are still working in the round.
Rnd 2: 2sc in the first st, sc in the next 3sts, 2sc in the next 2sts, sc in the next 3sts, 2sc in the last st (14)
Rnd 3: 2sc in the first st, sc in the next 5sts, 2sc in the next 2sts, sc in the next 5sts, 2sc in the last st (18)
Rnd 4: 2sc in the first 2sts, sc in the next 5sts, 2sc in the next 4sts, sc in the next 5sts, 2sc in the last 2sts (26)
Rnd 5: In BLO, sc in each st around (26)
Rnd 6: in BOTH loops, sc in each st around (26)
Rnd 7: Sc in 11sts, (sc2tog) twice, sc in the last 11sts (24)
Rnd 8: Sc in 9sts, (sc2tog) 3 times, sc in the last 9sts (21)
Rnd 9: Sc in 8sts, (sc2tog) 3 times, sc in the last 7sts (18)
Rnd 10: *Sc in first st, sc2tog* Repeat from *to* around (12)
Rnd 11: Sc in each st around (12)
Stuff the foot at this point, as it will get more difficult to stuff it later.
Rnd 12: Sc in each st around (12) On the last st of this round, change yarn to red.
Rnd 13 – 19: Sc in each st around (12)
Rnd 20: Sc in 9sts, hdc in the next 2sts, sc in the last st (12)
Start stuffing the leg.
Rnd 21: *1sc, 2sc* Repeat from *to* around (18)
Rnd 22 – 25: Sc in each st around (18)
Rnd 26: Sc in the first st, hdc in the next 8sts, sc in the last 9sts (18)
Rnd 27 – 29: Sc in the first st, hdc in the next 8sts, sc in the next 2sts, slst in the next 6sts (DO NOT slst too tight), sc in the last st (18) Slst in first st of last rnd and finish off, leaving a long tail to sew the leg to the body. Finish stuffing.
**NOTE – the top of the leg will look like it is on a slant**


Left Leg and Foot
With G hook and black:
**Starting with the sole of the foot and working up**
Rnd 1: Ch5, sc in second st from hook and in next 2, 3sc in last st, (working on other side of chain) sc in next 2sts, 2sc in last st (10) Place your stitch marker in this last st, DO NOT JOIN as we are still working in the round.
Rnd 2: 2sc in the first st, sc in the next 3sts, 2sc in the next 2sts, sc in the next 3sts, 2sc in the last st (14)
Rnd 3: 2sc in the first st, sc in the next 5sts, 2sc in the next 2sts, sc in the next 5sts, 2sc in the last st (18)
Rnd 4: 2sc in the first 2sts, sc in the next 5sts, 2sc in the next 4sts, sc in the next 5sts, 2sc in the last 2sts (26)
Rnd 5: In BLO, sc in each st around (26)
Rnd 6: in BOTH loops, sc in each st around (26)
Rnd 7: Sc in 11sts, (sc2tog) twice, sc in the last 11sts (24)
Rnd 8: Sc in 9sts, (sc2tog) 3 times, sc in the last 9sts (21)
Rnd 9: Sc in 8sts, (sc2tog) 3 times, sc in the last 7sts (18)
Rnd 10: *Sc in first st, sc2tog* Repeat from *to* around (12)
Rnd 11: Sc in each st around (12)
Stuff the foot at this point, as it will get more difficult to stuff it later.
Rnd 12: Sc in each st around (12) On the last st of this round, change yarn to red.
Rnd 13 – 19: Sc in each st around (12)
Rnd 20: Sc in 9sts, hdc in the next 2sts, sc in the last st (12)
Start stuffing the leg.
Rnd 21: *1sc, 2sc* Repeat from *to* around (18)
Rnd 22 – 25: Sc in each st around (18)
Rnd 26: Sc in 9sts, hdc in the next 8sts, sc in the last st (18)
Rnd 27 – 29: Sc in the first st, slst in the next 6sts (DO NOT slst too tight), sc in the next 2sts, hdc in the next 8sts, sc in the last st (18) Slst in first st of last rnd and finish off, leaving a long tail to sew the leg to the body. Finish stuffing **NOTE – the top of the leg will look like it is on a slant**
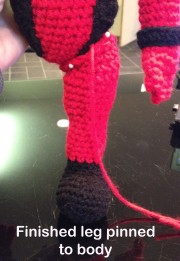
Pin the legs to the body first, making sure the feet are straight, then sew ¾ of the way and stuff the top of the leg a bit more, if needed and finish sewing. Weave in end.
Sword – Made in 2 Parts (Make 2) – Do Not Stuff
*With G hook and black (Part 1):
Rnd 1: 6sc in adj ring. (6) Pull ring closed.
Rnd 2: In BLO, sc in each st around (6)
Rnd 3: In BOTH loops, sc in each st around (6)
Rnd 4 – 12: Sc in each st around (6)
Rnd 13: In FLO, 2sc in each st around (12) Slst to beginning st of this round. Finish off and weave your end into the center to hide it.
*With G hook and gray (Part 2):
Working in the free 6 loops left over from Rnd 13, join with a slst to any free loop
Rnd 1: Sc in each free loop around (6)
Rnd 2 – 16: Sc in each st around (6)
Rnd 17: *Sc in first st, sc2tog* Repeat from *to* one more time (4)
Rnd 18: Sc in each st around (4) Slst to beginning st of this round. Finish off, leaving a tail to weave hole closed. Weave in end.
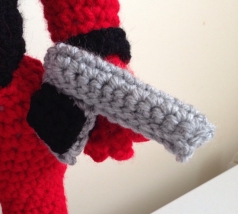
Gun (Make 2)
With E hook and gray:
Row 1: Ch 13, sc in second st from hook and in each st across, ch 1, turn (12)
Row 2 – 5: Sc in each st across, ch 1, turn (12)
Row 6: Fold the 2 long sides together and slst across. At the end, ch 1, turn (12) This creates the barrel of the gun.
Row 7: Working in the slst just made, sc in 4 sts, ch 1, turn (4)
Row 8: Sc in each st across, ch 1, turn (4)
Row 9: Sc in 3 sts, 2 sc in last st, ch 1, turn (5)
Row 10 & 11: Sc in each st across, ch 1, turn (5)
Row 12: In FLO, sc in each st across, ch 1, turn (5)
Row 13: In BLO, sc in each st across, ch 1, turn (5)
Row 14: Sc in each st across, ch 1, turn (5)
Row 15: Sc in 3 sts, sc2tog, ch 1, turn (4)
Row 16: Sc in each st across (4) Finish off, leaving a tail to sew.
Fold the end up to row 7 and sew this end there, making the handle of the gun. Use the remainder of the length of yarn to sew any open ends on the sides of the handle. Weave in any ends.
Grips (Make 4)
With E hook and black:
Row 1: Ch 5, sc in second st from hook and in next st, ch 1, turn (4)
Row 2: Sc in each st across, ch 1, turn (4)
Row 3: Sc2tog twice (2) Finish off, leaving a tail to sew to handle of the gun.
**Use snaps or Velcro to attach the guns to the hands**
Sword Back Strap (Make 2)
With G hook and black:
Row 1: Ch 60, dc in 3rd st from hook and in each st across (58) Finish off, leaving a tail to sew to whip stitch the 2 ends together. Slide the strap on the doll and place one end over the shoulder so it loops on the body diagonally. Once the 2 straps are on, place the swords in the X part on the back.


Jan 15, 2017 @ 17:36:33
Cool ! Very nicely done 👍🏻
LikeLiked by 1 person
Jan 15, 2017 @ 20:03:43
Thank you 🙂
LikeLike
Oct 21, 2017 @ 12:43:10
Loved making this for a young man’s birthday. Here’s my Ravelry project for it: https://www.ravelry.com/projects/MissErin73/deadpool
LikeLiked by 1 person
Nov 16, 2018 @ 19:08:30
Hello, what does mean sts? English is not no first language and I don’t know what it means, hope you can help me, I would appreciate it
LikeLike
Dec 01, 2018 @ 21:39:46
Hi Yese! Sts is an abbreviation for stitches
LikeLike